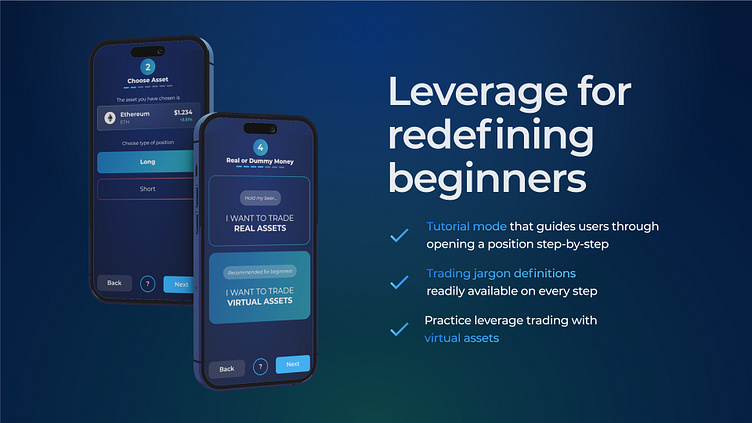
Beginner friendly crypto leverage trading
Simplifying a complex financial instrument for beginners was a real challenge for me. At first, it seemed almost impossible and even questionable. Still, I decided to create a user journey that would break down the process of opening a leveraged long or short position in a way that was easy to understand (that's where the brand name came from as well). This made beginners more willing to explore it. It was crucial to provide a dummy account where they could experiment and become comfortable with the product, especially considering how complex and risky these instruments can be.
1. Step - Choosing your asset
Here, users could explore the supported assets. One key feature of this UI was the hover-over user support, allowing them to read explanations for anything that wasn't immediately intuitive. This component was consistently used throughout the entire user journey.
2. Step - Choosing type of position (long/short)
Explaining what long and short mean can be challenging if the user isn't yet familiar with leverage. In spot trading, terms like buy and sell are more common. When trading with leverage, these terms typically shift to long and short. However, people still use phrases like "being long Bitcoin", which doesn't necessarily imply they're using leverage in their position.
3. Step - Choosing type of order
This concept is fairly straightforward. Traders rarely use market orders because they execute immediately at the current price. Instead, professional traders prefer limit orders, which give them more control over the entry price and help manage risk more effectively.
3.1 Choosing limit price (only Limit Order)
At this point, if users choose to go with a limit order, they can set the price at which they want to enter the market. Once the market price reaches that level, the position will be opened.
Implementing this process in a decentralized system is more challenging compared to a centralized one, as decentralized platforms typically rely on smart contracts and blockchain validation, which can add complexity and delays to the execution of limit orders.
4. Real Account or Dummy Account?
This step is critical when developing a complex financial product for users who are not yet familiar with it. It's a standard practice across the industry and greatly aids users in becoming comfortable with the platform before investing real money. Implementing a dummy account was relatively straightforward, as users can simply switch their RPC to a testnet, where the money holds no real value, making it a safe environment for learning and experimentation.
4.1 Connecting your crypto wallet
If users already have a wallet, that's great—they likely understand how dApps work. However, if a user is entirely new, they could watch a video tutorial on creating a wallet and what precautions to take. If I were to recreate this step now, I would add a feature using account abstraction. This would eliminate the need for users to store seed phrases and allow them to onramp funds instantly using debit cards, Apple Pay, Google Pay etc.
With account abstraction, more possibilities open up, such as:
1. Social Recovery: Instead of storing a seed phrase, users could set up trusted contacts or devices to help recover their wallet if needed.
2. Multi-Factor Authentication: Users could incorporate additional security layers, such as biometrics or OTP, without compromising decentralization.
3. Customizable Permissions: Users could define transaction limits, spending caps, or create time-based rules for certain operations.
4. Automated Transactions: Account abstraction could allow for scheduled payments or recurring transactions, similar to traditional banking features.
5. Enhanced User Experience: Simplified login methods, like email or phone number-based authentication, could reduce the friction typically associated with onboarding new users in the crypto space.
These improvements would make the platform more user-friendly and accessible, especially for those unfamiliar with blockchain technology.
5. Adding collateral
Collateral is a fancy word for the amount of your own money you're putting into a trade. I considered using a different term because "collateral" can sound complicated and intimidating, but the team ultimately decided to stick with it.
We also integrated an in-app quick swap feature, allowing users to easily exchange assets, as the platform only accepts collateral in USDC (don't ask me why).
6. Choosing leverage
This step is crucial because it shows you when you'll lose all your money if the trade doesn't go as planned. The higher the leverage, the greater the risk of losing your funds. Understanding this risk is vital for making informed trading decisions.
7. Position overview
In the final step before opening your position, you can review all the details once more. Ensure everything is correct, and when you're confident, open the position. Afterward, you'll be redirected to the "My Positions" section of the dApp, where you can edit your position, set take profit (TP) or stop loss (SL), share it, or close it.
Now, you're free to explore the rest of the platform, test how everything works without the tutorial mode, and see if you need a refresher. If you do, you can revisit the tutorial anytime to refresh your memory and maybe even take some notes.
Next steps?
If I were to revisit this project, I would definitely consider adding a few more steps, such as defining take profit targets and stop-loss points upfront. The web3 space evolves at such a rapid pace, with new technologies and advancements emerging almost daily. It's essential to keep iterating and refining the user experience to make it as intuitive and seamless as possible.


